

Hey friends! Are you loving the fact that spring is (finally) here? I know I am. Besides thoroughly enjoying the warming temperatures, I am in awe of all the spring flowers that are blooming right now. Every day, I feel like a new tree is blooming, tulips are popping up out of nowhere, the trees are getting their green leaves back... and I can't get enough. This is the time of year that I love taking my "good camera" with me everywhere and capturing as much of this short-lived beauty as I can. Anyone else with me on that one?
After sharing my photos of D.C.'s cherry blossoms last week, it occurred to me that some of you might want to capture some photos of all the pretty nature this spring too, but aren't quite sure how to do it. Or maybe you've tried and been frustrated that your photos haven't turned out quite like you were hoping. I am by no means a pro-photographer, but I've taught myself a lot over the years - and have enough experience to share some tips for taking photos like the ones I took of the cherry blossoms. (I'll be using some of those shots as examples below.) I promise not to get too technical on you, but you will need to be familiar with some basic camera vocabulary for this post to be helpful. If you've got a camera where you can change the settings (i.e. a DSLR or a fancy point-and-shoot), you should be able to apply these tips to your photography. If you have no interest in photography, please feel free to skip this post!
Just to note, I have a Canon Rebel XTi. I use both the kit lens (18-55mm f3.5-5.6) and a prime lens (50mm f/1.8).
Now let's get started! Long post alert... you may want to bookmark or pin this post for later when you have your camera in front of you.
Tip 1: Know your camera.
This could (and should) be a whole post in itself, but in short, get to know the ins and outs of how your camera operates. Either read your manual (ugh, I know...) or read a few blog posts on the basics of photography (good alternative option!). If you know what the buttons do and how they affect photos, you can change the settings to capture the shot you want! You don't have to be intimidated by all the buttons if you know what words like aperature, shutter speed and ISO mean and do.
Here are a couple of good blog posts to get you started:

Scary, I know, but if you do, you can play with so many more options! Now that you know your camera (tip 1), you can turn that dial away from the green rectangle and try out some of the other modes.
One of the best things about digital photography is that you can take as many photos as you want and see the results instantly - without the expense and time of developing rolls of film.
Tip 3: You don't have to shoot in manual to get the results you want.
I know this will relieve some of you :). To get a good outdoor shot, especially close ups of those pretty flowers, the major key is to manually change the aperture and let the camera do the rest. To do this, you'll need to put your camera in aperture priority mode (the Av setting on a Canon or A on a Nikon).


Tip 4: Pick your subject and focus on it.
This sounds like a "duh, Chaney" tip, but it's really important! When you look into your camera, you'll see little red dots flash for a moment as you're focusing on your camera (pushing the shutter button halfway down). Those are the focus points. If at least one of those dots isn't on your subject, it won't be in focus. This is especially important for the next tip...
Tip 5: To get photos with a sharply focused subject and a blurry background, set your aperture as wide as possible (lower f-stop number).
This is the shot people ask about the most, since it makes for a very pretty, professional-looking photo. It's actually really simple to get this effect by setting your camera to aperture priority mode and changing the aperture to its lowest setting (f-stop). This is a wide aperture setting. The lower the number, the blurrier you can make the background. Settings from about 1.8-3.5 work well. Get close to your subject (the closer the better), make sure you're focused on it, and take the photo. The camera does the rest.


Tip 6: To get photos with everything in focus, change your aperture a more narrow setting (higher f-stop number).
This works well for capturing landscapes. Think rolling hills, fields of flowers, etc. If you want everything in the shot the be in focus equally, set your aperture to a high number.


{both the house and the far away trees are in focus here}

Tip 7: Avoid shooting at mid-day on a sunny day.
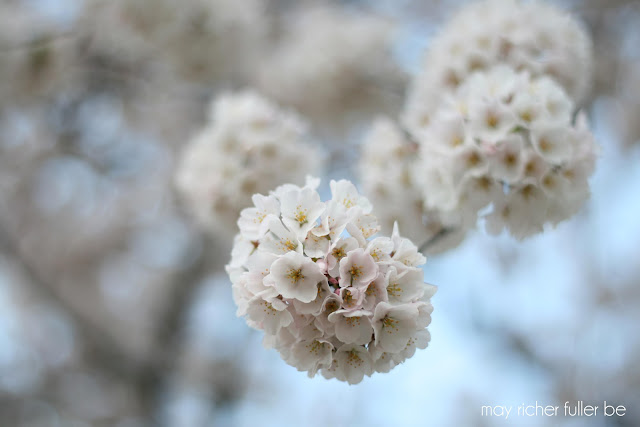
Early morning and late afternoon are usually the best and easiest times to shoot. Mid-day sun is really harsh and makes photography difficult. Softer light gives your subject a nice "glow" and you won't have to contend with harsh shadows.


{soft early morning light and clear skies made these cherry blossoms really glow}
Another thing to remember is to shoot with the sun at your back or to the side to light your subject well. Shooting toward the sun will result in dark subject. So unless that's what you're going for, avoid it.
Tip 8: If you like brighter photos, adjust the exposure compensation.
This tip is all about personal preference. I tend to like brighter, slightly over-exposed (but not blown-out) photos and by changing one simple setting on the camera, you can do this without needing to edit the photos later. By adjusting the exposure compensation up slightly, you can brighten your photos without having to change any other settings - a nifty little trick. To do this on a Canon, you'll need to be in any mode other than auto. Find the +/- button on the back of the camera and hold it down while turning the main dial left or right. On the LCD screen, as you turn the dial, you'll see a little area with a +/- scale. To make the photo brighter, move the bar on the scale to the + side. Do the opposite to make the photo darker.
Tip 9: Play with angles and distance from the subject.
Try shooting the same subject from a bunch of angles and distances. You'll notice big differences and you can see what you like best. The great part about nature? It's still life. It won't move, so it gives you time to make adjustments and play around with the camera and settings. Take your time and I promise you'll get some great shots!

{shooting a branch straight on}

{shooting up at the flowering branches}
I could go on and on, but I think I'll wrap this post up for today. If you have specific questions, leave them in the comments and I'll get back to you! Have a great Wednesday :).
---------
linking up to: Rain on a Tin Roof, Home Stories A to Z, Uncommon Designs, If It's Not Baroque, Liz Marie Blog, House of Hepworths, Blissfully Ever After, Design, Dining and Diapers, The
Shabby Creek Cottage, Tatertots and Jello, Serenity Now, It’s Overflowing, Dear Creatives
featured on:
featured on:


I am always looking for some good photography tips...Taking a trip to Ireland this summer and plan on a LOT of outdoor photography. I will definitely take some of these tips along. Thanks!
ReplyDeleteAnne @ circusberry.wordpress.com
Glad I could help! Hope you enjoy your Ireland trip - I'm jealous!
Delete- Chaney
Pinning! Always looking to improve my photography. Thanks.
ReplyDeleteYou're welcome!
DeleteThanks, Chaney, for posting these great tips. I love "fuzzy" backgrounds but when I actually get out doing the photography, I forget which way to go! I am pinning this to read later, like you suggested. I saw your post over at "Serenity Now".
ReplyDeleteGreat! Glad I can help. Once you do it a few times, you get the hang of it and it'll become second nature. Have a great weekend!
DeleteGreat tips, Chaney! I don't actually have a DSLR or even a fancy enough point and shoot to use most of these tips, but I'm trying my best to learn how to photograph with e DSLR and praying that somehow or another I find one that someone isn't using and is willing to give away, or an amazing deal of an older model. Thanks again for the helpful tips. I'm definitely saving this post for later!
ReplyDeleteThanks! My DSLR is about 5 years old, and I just did a quick search for a used version of my model (Canon XTi) on Amazon, and you can definitely find a pretty good deal! Take a look around and I'll bet you can find one in your price range. It's worth the investment if you're a photography lover. Thanks for stopping by :).
DeleteI think these are great easy steps to learning to take better photos & stepping outside comfort zone, thanks for sharing. come link up your post at DearCreatives.com I think my readers would love your post. I'm pinning it & a new follower.
ReplyDeleteThanks, Theresa! I'd love to link up :).
DeleteThanks for linking up! Featuring you tomorrow! Drop by to see the feature & feel free to link up each week. Grab a featured button when you visit or email me & I can send it to you! Have a great weekend & hope you can make it by!
ReplyDeleteThanks so much Theresa!! I am honored! Have a great weekend :).
DeleteThanks for these great tips! Your photos are marvelous! Have a wonderful weekend! Linda
ReplyDeleteThanks for stopping by, Linda! Hope you have a fabulous weekend as well!
DeleteWhat about ISO settings, any rules of thumb to follow...?
ReplyDeletePersonally I will suggest to use the lowest ISO (100-200) as to reduce the noise lvl.Just my 2 cents.
DeleteThank you for this tips especially the aperture part . This will help me alot with taking photos and great beginning for my new page "Bitar photography" and hope u post about indoor tips and about the iso
ReplyDeleteThe photography which you have shared within this post, could be really impressive and creative in the sense. Thanks a lot for sharing this snaps. Wedding Photographers in Coimbatore | Wedding Video In Coimbatore
ReplyDeleteThis comment has been removed by the author.
ReplyDeleteThanks for giving the wonderful blog. This tips are very helpful to me and everyone who wants to be a export in candid photography. Visit here >> Wedding Photographers in Coimbatore
ReplyDeleteThe pictures and flowers are amazing.Here the site:http://www.yabeshphotography.com/
ReplyDeleteExcellent website. Lots of useful information here.
ReplyDeleteAkPhotography
Wedding
Engagement
Post Wedding
Juhu Escorts | Call Girls in Juhu | Juhu Call Girls | Escorts in Juhu | Russian Juhu Escorts | Call Girls Service in Juhu | Escort Service in Juhu
ReplyDeletePunjabi Call Girls in Juhu | Juhu Escort | Independent Juhu Escorts | Independent Escorts in Juhu | Juhu Escorts Agency
Juhu Escorts Service | Escorts Agency in Juhu | Escorts Juhu | Juhu Female Escorts | Juhu Escorts Models
Juhu Model Escorts | Cheap Juhu Escorts | Juhu Independent Escorts | Escorts Girls in Juhu | Juhu Escorts Girls
Call Girls Juhu | College Escort in Juhu | Escorts Service Juhu | Best Escort services in Juhu | Escorts services in Juhu
Independent Call Girls in Juhu | Russian Escorts in Juhu | Collage Call Girls in Juhu | Celebrity Escorts in Juhu | Call Girls Juhu Whatsapp No
Juhu Escorts Whatsapp Phone Number | Juhu Escorts Phone Number | High Class Juhu Escorts | http://www.priyaescorts.in/juhu-escorts.html
company website cheap designer bags replica visit this page luxury replica bags click resources Louis Vuitton replica Bags
ReplyDeletesource de l'image Dolabuy Goyard vérifier ces gars-là répliques de sacs de créateurs en gros lire toutes les informations ici https://www .dolabuy.co
ReplyDeleteclick here for more info look at this web-site pop over here website here browse around this website his comment is here
ReplyDeletecheck out this site replica gucci Visit This Link Dolabuy Prada check over here Dolabuy Gucci
ReplyDelete